Streamlining Your Workflow with GeoBox
Content Preparation as an Output-Side Implementation Using GeoBox
What This Page Addresses
This page documents how content preparation for large wall displays is implemented at the system level, rather than at the content production stage.
It explains how a single, complete visual canvas is delivered as input, and how cropping, geometry correction, and edge blending are executed after signal reception, at the display processing layer. This page does not describe creative tools, UI operations, or step-by-step user instructions. Its purpose is to clarify where specific responsibilities are handled in the signal chain, and why this separation matters for large-scale display systems.
Large Wall Displays and Non-Standard Display Topologies
Large wall displays, including multi-projector environments and non-standard resolution video walls, rarely conform to conventional display formats. Their total resolution is often determined by physical layout, display count, and installation constraints rather than by standard video timings.
As a result, these systems introduce challenges that cannot be resolved purely at the content production level, especially when display topology and physical alignment cannot be guaranteed in advance.
We asked an experienced content creator from the famous content creation company- Kiss the Frog: “How do content creators and system integrators align when prepping content for massive displays?” His answer was a forehead-slapping moment.
“We design the full content, but splitting it for multiple displays and reassembling it? That’s a different game. Integrators must tell us exactly how to cut it—down to the pixel.”
No wonder the top question we get—even from the most experienced pros: “how do you want us to cut the content?”
Well, why cut content at all? 🤔
Our answer? We don’t. GeoBox doesn’t need pre-cut content.
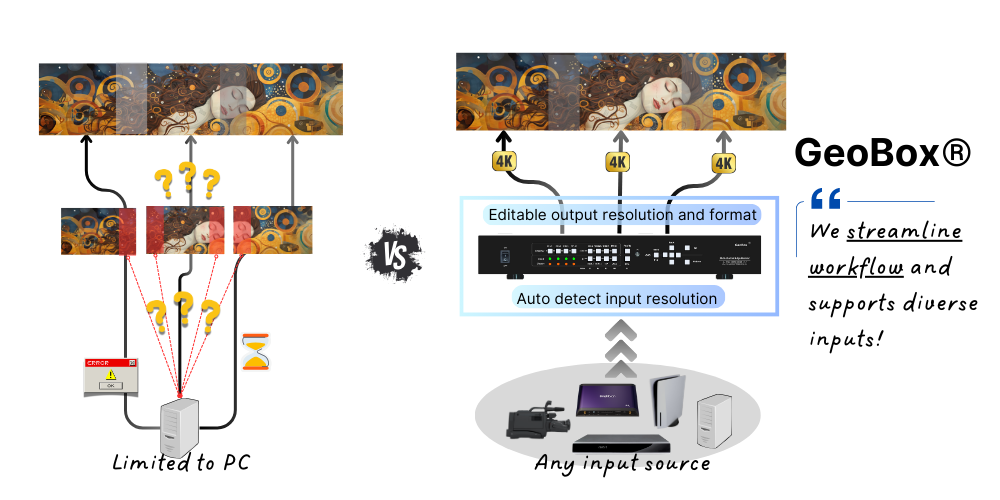
Single-Canvas Content as an Input Contract
In this implementation model, the content layer delivers one complete visual canvas as its output.
The content defines:
- Overall composition
- Aspect ratio
- Total resolution
It does not encode:
- Per-display cropping boundaries
- Overlap regions
- Geometry compensation
This establishes a clear input contract: content remains independent of display topology, while physical mapping is resolved downstream.
1. Application type and required content aspect ratio
Before delving into content creation, it’s crucial to understand the type of application you’re going to build. In general, there are two types:
Type 1: Building a system for displaying customized content. This is typically used in museums, immersive spaces, or retail environments.
Type 2: Building a system that displays off-the -shelf contents, such as movies, PowerPoint slides, or live camera streams. This is commonly found in school or corporate auditoriums.
To prevent distortion when displaying content, we need to maintain the proper aspect ratio. For Type 1 applications, simply align the customized content’s aspect ratio with that of the entire display area. For example, if your target area measures 10 meters in width and 2 meters in height, the content should maintain a 10:2 aspect ratio—equivalent to 5000 × 1000 pixels or 10000 × 2000 pixels. For Type 2 applications, it’s even simpler—no preparation needed. You can send off-the-shelf content directly to the GeoBox and choose to display it either full screen or with an adjusted aspect ratio, one of the key features offered by GeoBox.
Tip: It’s worth noting that you do NOT need to crop your content for each display device beforehand. You can leave this task to GeoBox by using the video wall and overlap features to perform real-time adjustments according to the onsite situation for the best result.
2. Determine Content Resolution
Another factor to consider is the optimal signal resolution. This involves calculating the “combined resolution” of all the projectors, taking into account the “overlap of pixels”.
In theory, the optimal signal resolution can be calculated by summing the resolutions of all projectors and subtracting the pixels in the overlap area. For instance, if you have three 1920×1200 projectors arranged horizontally with a 20% overlap, the optimal resolution would be 4992×1200 pixels. The calculation is: (1920 x 3) – (1920 x 0.2 x 2) = 4992.
Wait… why the image ratio does not match the wall!
The content has been created with a 21:9 aspect ratio to fit the display area, but the projector use a 16:9 or 16:10 aspect ratio. As a proAV professional, you’re likely familiar with the initial projection image not fitting the display area. Furthermore, it’s also common for the source resolution to not match the aspect ratio of the display area, because the playback device might only output standard resolutions. This is very common with most media players.
GeoBox offers a simple solution to this problem. Its basic yet powerful geometric alignment feature allows you to reshape each image to fit the aspect ratio of the target display area. When GeoBox is set to the selectabale “Full screen” mode, the content fills up the entire output image. Thus, as long as the content is created in the same aspect ratio as the combined display area, there will be no distortion in the final combined image, regardless of the source resolution.
Image Clarity: It's all about Pixel Pitch
Knowing the ideal resolution for your content is helpful, but it’s not always achievable. What’s more important is figuring out the resolution you truly need. This depends on how clear you want your images to be, which relates to the viewing distance and pixel pitch.
Pixel pitch is determined by dividing the size of the image by the system resolution. The closer people are to the screen, the smaller the pixel pitch should be. A simple rule suggests that if people are X meters away, each pixel should ideally be X millimeters wide. For example, if people are 5 meters away and the image is 20 meters wide, a pixel pitch of 5mm is required, indicating a necessary resolution of 4K. Additionally, when discussing resolution, it’s not limited to projectors or source devices. It encompasses the entire setup, including content sources, controllers, transmission elements such as cables and connectors, all the way to the projectors themselves.
3. Determine the Playback Device
While GeoBox allows the use of any playback device, selecting the right one is crucial for a smooth workflow and seamless content delivery, enhancing the viewer experience. Consider the following factors when making your choice:
- Complexity of your content: Does it involve 3D content, touch interactivity, or require high resolution?
- Versatility: Do you need to handle various types of content, such as videos, slideshows, presentations, or online streams?
- Plug-and-play: Do you prefer a dedicated and pre-configured content playback device that doesn’t require complex setup?
By carefully considering these factors, you can select the most suitable playback device that aligns with your specific content requirements and installation preferences. Three main options for playback devices – laptop, desktop PC, and media player – each have their strengths and weaknesses. If you want a dedicated device with plug-and-play functionality, a media player (BrightSign, for example) is an ideal choice. If flexibility is crucial, a laptop would be the most suitable. If performance and complex content handling are important, a desktop PC may be the better option.
Tip: Want to seamlessly integrate and switch between multiple sources?
GeoBox’s ability to support nearly any playback device is extremely useful when you need to utilize the same display area for various tasks. Typically, you might use a media player for video playback and a laptop for PowerPoint presentations. GeoBox offers exceptional flexibility by enabling seamless source switching or simultaneous playback from multiple sources.
Here’s a practical example from higher education in the Netherlands to illustrate how this works:
Creating large projection in School Theater for multiple purposes (Netherlands)
Real world reference cases
Understanding the process is best achieved through examples. We’ve prepared the following example to better explain the concept:
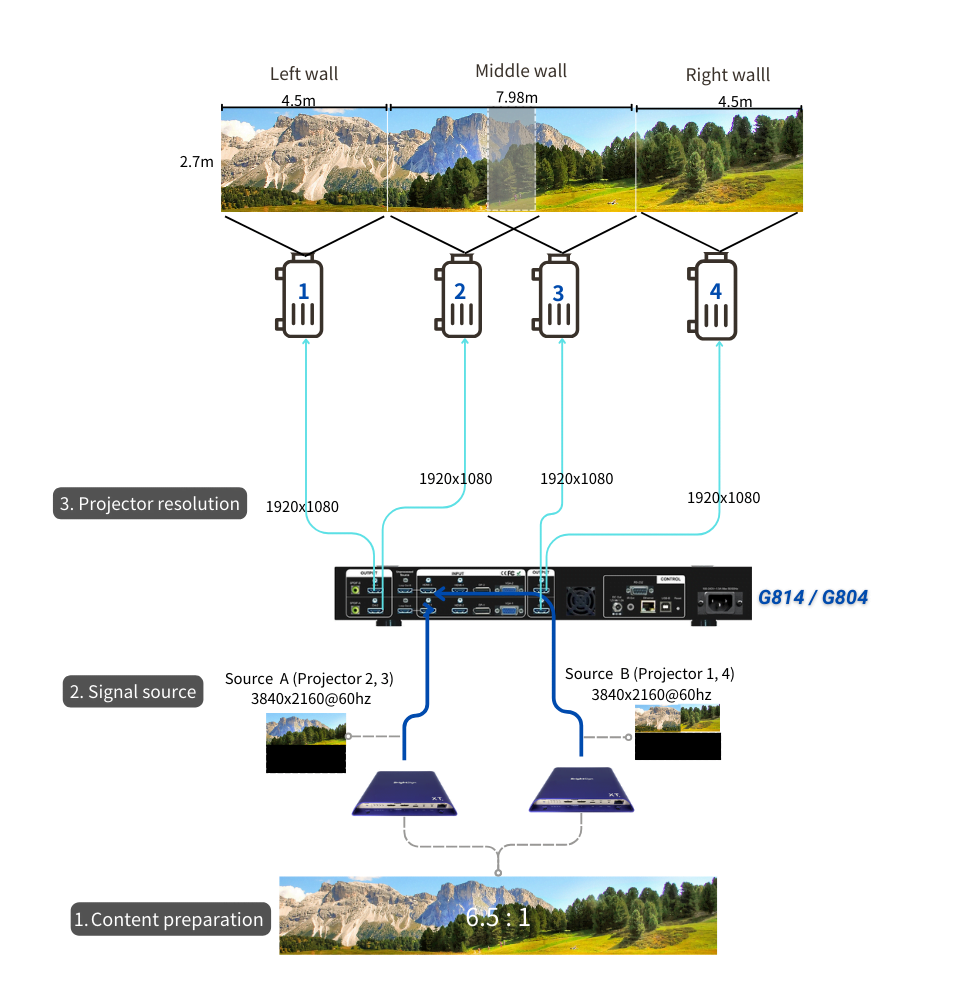
Case 1: 125 years Bosch in UK, Immersive experience room
Project requirements:
Need to project one content across three walls (width: 4.5m-7.98m-4.5m, height: 2.7m) using four projectors. The longer middle wall is projected by two projectors, and the walls on each side are each projected by one projector.
Configuration diagram
- Decide content aspect ratio: To avoid image distortion, the playback content was prepared to match the final combined image’s aspect ratio, that is (4.8+7.98+4.8) : 2.7 = 17.58 : 2.7 = 6.5:1.
- Decide source resolution: We used four FHD (1920×1080) resolution projectors. The wall in the middle has a 20% overlap area. The optimal horizontal resolution is 1920×4 – 1920x 0.2 = 7,296 pixels. Given a viewing distance of around 3 meters, the pixel pitch can’t be larger than 3mm. As the total width of the three walls is 17.58m, the necessary system resolution is 5,860 pixels horizontally (17580mm/3mm).
- Select proper playback device and arrange content for it: The client preferred to use a dedicated content playback device, so BrightSign media player was used in this project. In order to reach the necessary system resolution, the content was cropped into two sources. The middle area content with the dimension of 7.98×2.7 was converted into Source A in the reoslution of 3840×2160@60hz. The rest of two contents for the side walls were in the dimension of 4.5×2.7 each, and were combined into Source B in the resolution of 3840×2160@60hz. Each of these 4K sources was fed into the two inputs of the G804. The G804 was then used to crop the content from source A for projector 2 & 3 with overlapping area in the middle, and to crop the content from source B for projector 1 & 4. The G804 also controlled the geometric alignment for all projectors and edge blending for projector 2&3.
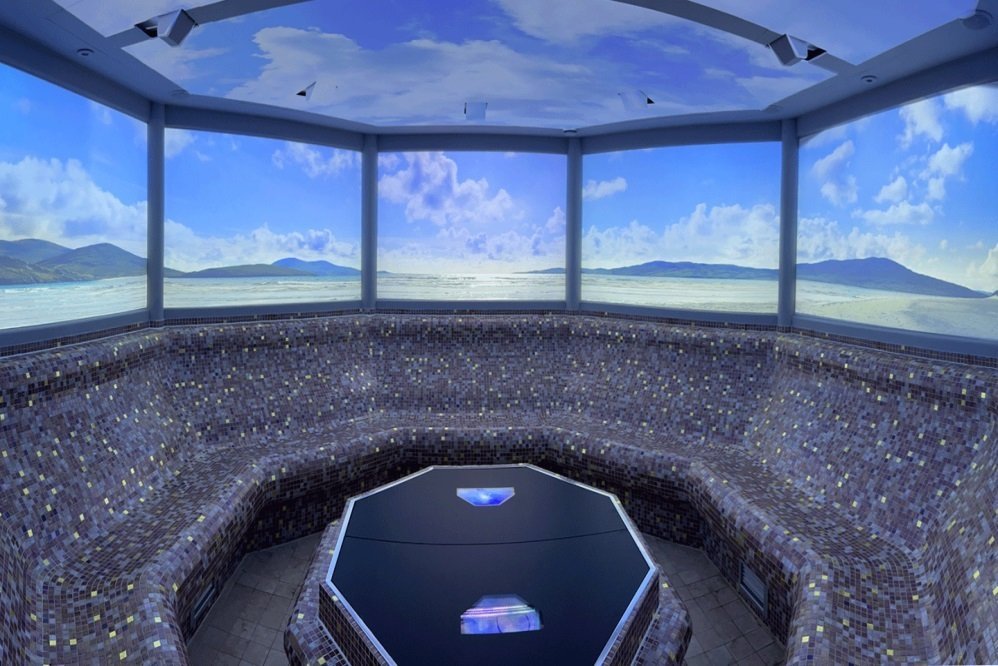
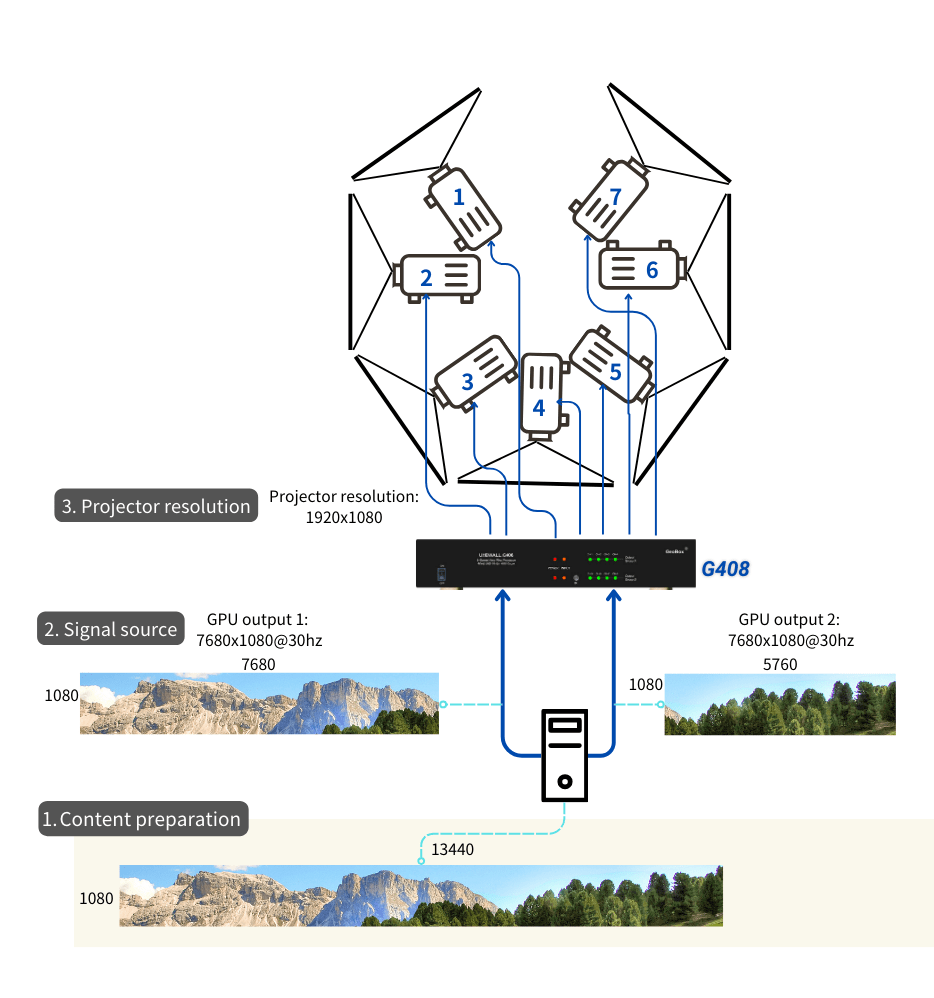
Case 2: The Immersive SPA Room at Ragdale Hotel - Surrounding Wall Part
Project requirements:
Needed to project on 7 walls with 7 HD projectors to create a fully immersive experience in a SPA room. Active projecting area of each wall is in the dimension of 1.65m x 1m, and 16cm width gap between each two walls.
Configuration diagram
- Decide content aspect ratio: To avoid image distortion, the playback content is prepared in the same aspect ratio as the final combined image. In this instance, the content image is created in (1.65×7+0.16×6) :1 = 12.44:1.
- Decide source resolution: This case uses seven Full HD (1920×1080) resolution projectors. The optimal horizontal pixel count is 1920×7 = 13,440. The optimal resolution is 13,440×1080. Given that the viewing distance is around 1 meter, the pixel pitch cannot exceed 1mm. This means the necessary system resolution needs to be 13,440 pixels horizontally.
- Select proper playback device and arrange content for it: In order to reach the necessary resolution of 13440×1080, we used a PC capable of outputting two 7680×1080 signals.
The content was arranged in two 8K*1K signals. The first source (GPU output 1) was created from an 7680×1080 content transformed into a 8K/1K source. The second source (GPU output 2) was created from 5760×1080 content with 1920×1080 black content transformed into another 8K/1k source. Each of these 8K sources go to the two inputs of G408. The G408 is then used to divide the first 8K image into four pieces and output them to projectors 1 to 4. Similarly, the second 8K image is also divided into four pieces and output them to projectors 5 to 7. Given that there are gaps among the projectors, the G408 also allowed us to adjust the edge of each projected image using the overlap adjustment function.
Related articles:
The Synergy of Using BrightSign Player with GeoBox video Controller
How to display a large image using multiple projectors?
Edge blending calculator for multi-projector project planning
125 years BOSCH in the UK: Powered by GeoBox and Panasonic
Immersive Fusion: The Technological Creativities of Ragdale Hall Spa’s Thought Zone