Seamless Edge Blending: La soluzione di innalzamento del livello del nero di GeoBox per i professionisti AV
Perché la sovrapposizione appare più luminosa nelle scene scure e come risolverla correttamente
Questa è una pagina parlante del nostro Hub per sistemi di visualizzazione multiproiettore. Si concentra su una modalità di guasto specifica che spesso appare dopo un sistema sembra completamente calibrato:
non uniformità del livello del nero (banding) nelle regioni di sovrapposizione, particolarmente visibile nelle scene scure.
Se siete ancora nella fase di pianificazione del sistema (numero di proiettori, layout, strategia di risoluzione), iniziate prima con la panoramica degli hub. Questa pagina presuppone che la geometria e la miscelazione siano già corrette e che ci sia qualcosa che non va. ancora sembra sbagliato.
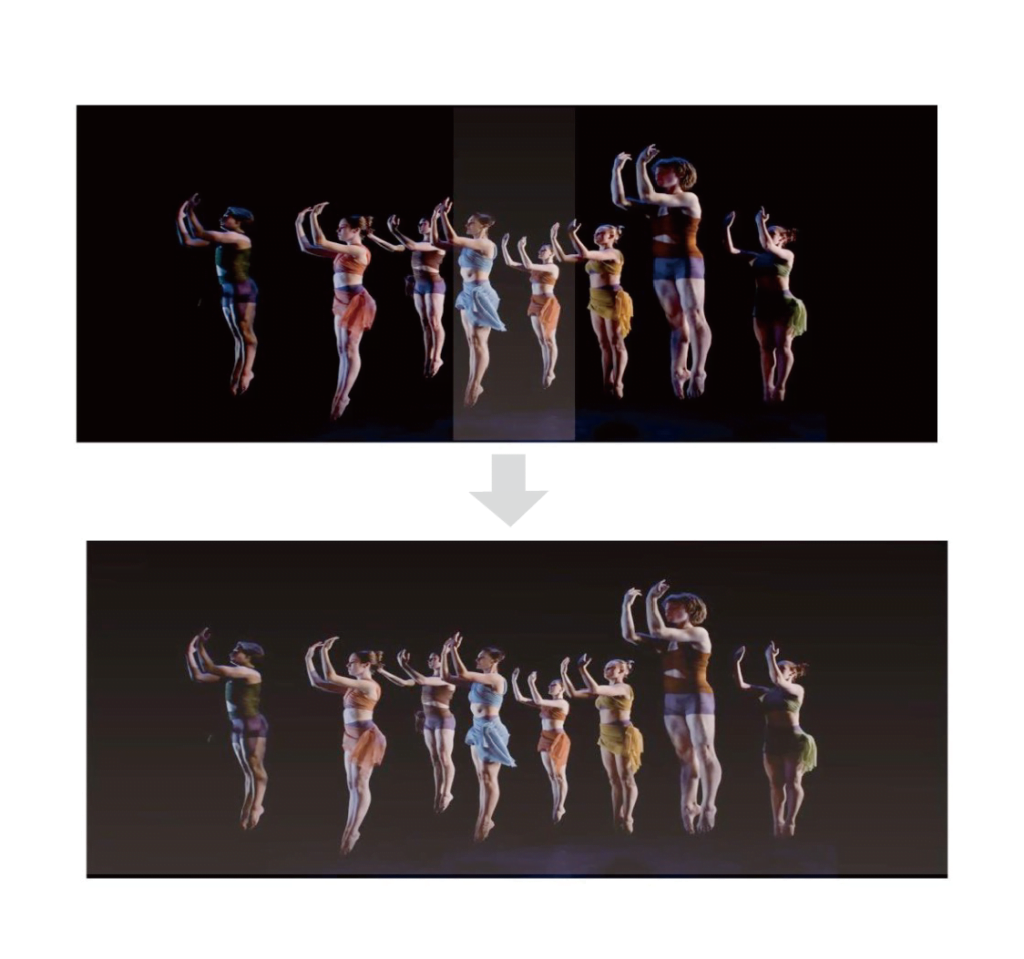
Il sintomo: sovrapposizione luminosa in scene scure
Una lamentela tipica delle installazioni con più proiettori è la seguente:
“Tutto è perfettamente allineato, la miscelazione è perfetta".
ma nelle scene scure, l'area di sovrapposizione è chiaramente più luminosa”.”
Questo effetto è spesso chiamato bande del livello del nero o sovrapposizione del bagliore.
Caratteristiche principali:
- È più visibile nei contenuti quasi neri (2-10% grigio)
- Diventa peggiora quando la luminosità complessiva è ridotta
- Spesso appare dopo la messa in servizio, non durante la configurazione iniziale
- Rifare la geometria o la fusione dei bordi non lo rimuove
Questo è il punto in cui molti team iniziano a inseguire il problema sbagliato.
Perché succede (e perché non è un errore)
La causa principale è la mancata miscelazione della matematica.
È fisica del proiettore.
I proiettori non emettono mai il “nero vero”.”
Anche con i proiettori laser e i modelli ad alto contrasto nativo:
- I motori leggeri emettono ancora luce residua
- I percorsi ottici perdono una luminanza piccola ma misurabile
- “Il ”nero" è sempre grigio scuro, non zero
La sovrapposizione aggiunge luce, anche in nero
In un sistema edge-blended:
- Un'area non sovrapposta = luce da un proiettore
- Un'area di sovrapposizione = luce da due proiettori
Nelle scene luminose, questa differenza viene mascherata.
Nelle scene buie, diventa evidente.
Ecco perché:
- Il sistema può essere geometricamente perfetto
- La curva di miscelazione può essere matematicamente corretta
- E la sovrapposizione ancora sembra più luminoso
Non c'è nulla di “sbagliato”: state semplicemente vedendo il limite fisico della proiezione.
Perché spesso appare dopo che il sistema è “finito”.”
Il banding del livello del nero è noto per la sua comparsa in ritardo nel ciclo di vita del progetto:
- Dopo l'invecchiamento della lampada o la stabilizzazione della potenza laser
- Dopo la calibrazione finale del colore e la regolazione del contrasto
- Dopo che i creatori di contenuti hanno iniziato a usare scene più scure
- Dopo la riduzione dell'illuminazione dell'ambiente
Per questo motivo viene spesso segnalato come un problema del post-handover.
A questo punto, cambiare proiettore o riprogettare il sistema è raramente un'opzione.
La soluzione deve funzionare a livello di sistema, non per proiettore.
Come confermare la presenza di un banding del livello del nero
Prima di tentare qualsiasi correzione, verificare correttamente il sintomo:
- Visualizzazione di un modello di test quasi nero (grigio 2-5%)
- Oscurare la stanza il più possibile
- Osservare le regioni di sovrapposizione e quelle di non sovrapposizione.
- Riducete la luminosità complessiva: le bande dovrebbero diventare più chiare.
- Scambio di posizioni del proiettore
- Se la banda luminosa rimane nello stesso punto, si tratta di un effetto a livello di sistema.
- Se si muove, può contribuire la varianza ottica
Se la geometria, la messa a fuoco e le curve di sfumatura sono già corrette, questo conferma una problema del livello del nero, Non si tratta di un errore di miscelazione.
Percorsi risolutivi comuni (e loro limiti)
Ci sono solo pochi modi per affrontare questo problema:
1. Proiettori a contrasto nativo più elevato
I proiettori di fascia alta riducono l'effetto, ma:
- Non eliminano la luce residua
- Aumentano significativamente il costo del sistema
- Non risolvono completamente l'addizione di sovrapposizioni
2. Controlli del livello del nero interni al proiettore
Alcuni proiettori di qualità superiore offrono una compensazione limitata del livello del nero o della sovrapposizione:
- L'efficacia varia a seconda della marca e del modello
- I controlli sono spesso grossolani o statici
- La coerenza tra i proiettori è difficile da mantenere
3. Compensazione globale del livello del nero (a livello di sistema)
Questo è l'approccio più controllabile e ripetibile:
- Tratta il livello del nero come un problema dell'ampiezza della tela
- Corrisponde alle regioni non sovrapposte alla luminanza sovrapposta
- Preserva l'uniformità visiva dell'intera immagine
- È qui che si rende necessaria un'elaborazione esterna.
Innalzamento globale del livello del nero con compensazione a 9 regioni
Un'implementazione pratica della compensazione a livello di sistema è innalzamento del livello di nero multiregionale.
Invece di cercare di rendere più scura la sovrapposizione (cosa fisicamente impossibile), il sistema:
- Aumenta leggermente i livelli di nero nelle aree non sovrapposte.
- Corrispondono alla luminanza residua della sovrapposizione
- Crea un campo scuro visivamente uniforme
Perché 9 regioni?
L'utilizzo di più zone (in genere una griglia 3×3) consente:
- Controllo più fine sulla tela
- Compensazione della variazione da proiettore a proiettore
- Adattamento alle asimmetrie di installazione del mondo reale
Questo approccio funziona indipendentemente dal contenuto e rimane stabile nel tempo.
Il compromesso (e perché di solito ne vale la pena)
L'elevazione del livello nero non è una magia ed è importante essere espliciti:
- Il livello del nero più profondo in assoluto è leggermente aumentato
- Si scambia il nero teorico minimo per uniformità pratica
Nelle installazioni reali, questo compromesso è quasi sempre accettabile:
- Le scene scure appaiono coerenti invece che frammentate
- Gli spettatori smettono di notare i confini delle sovrapposizioni
- Il sistema si comporta in modo prevedibile anche molto tempo dopo la messa in servizio
Per ambienti immersivi, simulazioni, musei e immagini su larga scala, L'oscurità uniforme batte sempre il nero perfetto.
Quando potrebbe non essere necessario
La compensazione del livello del nero potrebbe non essere necessaria se:
- I contenuti sono sempre brillanti
- Le regioni di sovrapposizione sono piccole o nascoste
- La luce ambientale maschera i dettagli quasi neri
- Il numero di proiettori è minimo
Ma quando si tratta di contenuti scuri, di più proiettori e di una visione critica, la gestione del livello del nero non è più facoltativa.
Letture correlate e contesto del sistema
- Sistemi di Visualizzazione Multiproiettore - panoramica a livello di sistema e principi di pianificazione
- Come pianificare più proiettori - Risoluzione, layout e fondamenti di geometria
- Evitare i più comuni errori di sfumatura dei bordi - Risoluzione dei problemi prima di dare la colpa all'hardware
- Elaborazione della sfumatura dei bordi e del warping - quando si rende necessario un trattamento esterno